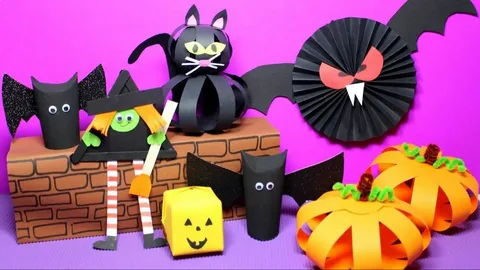
Halloween is the perfect time to unleash your creativity and add a personal touch to your decorations. With just a few supplies, you can create spooky paper crafts that will impress your friends and family. In this article, we’ll guide you through three fun DIY Halloween paper crafts: 3D paper bats, origami pumpkins, and paper lanterns with spooky designs. Let’s get crafting!
1. 3D Paper Bats
Materials Needed:
- Black cardstock or construction paper
- Scissors
- Pencil
- Glue or double-sided tape
- Optional: Googly eyes or white gel pen for details
Instructions:
- Draw the Bat Template: Start by drawing a bat shape on your black cardstock. You can create your own design or find a template online. A simple bat shape includes a rounded body and wings that extend outward.
- Cut Out the Bat: Carefully cut out the bat shape using scissors. If you’re making multiple bats, you can stack the cardstock and cut several at once.
- Create 3D Wings: To give your bat dimension, gently fold the wings upwards at the base where they connect to the body. This will create a 3D effect.
- Add Details: Use googly eyes for a fun look or draw eyes with a white gel pen to add a spooky touch.
- Display Your Bats: Use glue or double-sided tape to attach the bats to walls, ceilings, or doorways. You can also hang them from strings for a flying effect!
Tips:
- Experiment with different sizes and wing shapes for variety.
- Consider using glow-in-the-dark paint or stickers for an eerie glow at night.
2. Origami Pumpkins
Materials Needed:
- Orange origami paper (or regular orange paper cut into squares)
- Green paper (for leaves and stems)
- Scissors (if using regular paper)
- Bone folder (optional, for crisp folds)
Instructions:
- Prepare Your Paper: If you’re using regular paper, cut it into 6-inch squares. For origami paper, you can use it as is.
- Fold the Pumpkin Base:
- Start with the colored side facing down.
- Fold the square in half diagonally to form a triangle.
- Fold the triangle in half again to create a smaller triangle.
- Unfold back to the original square.
- Fold each corner of the square into the center crease line to form a smaller square.
- Create Pumpkin Segments:
- Flip the paper over and fold each corner into the center again.
- This will create layers that resemble pumpkin segments.
- Form the Pumpkin:
- Pinch the top of the pumpkin together and push inward slightly to create a rounded shape.
- Secure with glue if necessary.
- Add Leaves and Stem:
- Cut out leaves from green paper and attach them to the top of your pumpkin.
- You can also cut a small rectangle for the stem and glue it in place.
Tips:
- Use patterned origami paper for added flair.
- Create various sizes of pumpkins for an adorable pumpkin patch display!
3. Paper Lanterns with Spooky Designs
Materials Needed:
- White or orange cardstock
- Scissors
- Black craft paper (for spooky designs)
- LED tea lights
- Tape or glue
- Optional: Free spooky face templates (available online)
Instructions:
- Create Lantern Base:
- Cut a rectangular piece of cardstock (about 8×10 inches).
- Fold it in half lengthwise.
- Cut slits along the fold (about 1 inch apart) but stop about an inch from the bottom to create flaps.
- Decorate with Spooky Designs:
- Use black craft paper to cut out spooky shapes like ghosts, bats, or pumpkins.
- Glue these shapes onto one side of your lantern base so they peek through when lit.
- Assemble Lantern:
- Unfold your lantern base and bring up the sides to form a cylinder shape.
- Secure with tape or glue at the seams.
- Add Light Source:
- Place an LED tea light inside your lantern.
- If desired, drape black cheesecloth over the lantern for an added ghostly effect.
- Display Your Lanterns:
- Place them on tables, hang them from hooks, or line them along walkways for an enchanting glow.
Tips:
- Experiment with different spooky designs and colors for a unique look.
- Consider adding glitter or metallic accents for extra sparkle!
Conclusion
These three fun DIY Halloween paper crafts—3D paper bats, origami pumpkins, and spooky lanterns—are perfect for adding a personal touch to your Halloween decorations. They are simple enough for crafters of all ages and can be customized to fit your unique style. Gather your materials, unleash your creativity, and enjoy crafting these delightful decorations that will surely impress everyone this Halloween! Happy crafting!
Citations:
[1] https://chalkingupsuccess.com/halloween-paper-lanterns/
[2] https://burtonavenue.com/diy-halloween-paper-lantern/
[3] https://craftingmyhome.com/diy-paper-halloween-lanterns/
[4] https://www.countryliving.com/home-design/decorating-ideas/g28647854/amazon-halloween-decorations/
[5] https://www.elledecor.com/design-decorate/trends/g2685/halloween-decorations-you-can-use-all-year/
[6] https://www.youtube.com/watch?v=ZYTo01TzXyE
[7] https://www.hgtv.com/design/make-and-celebrate/handmade/our-55-favorite-halloween-decorating-ideas-pictures
[8] https://www.goodhousekeeping.com/holidays/halloween-ideas/a62135441/best-halloween-decor-releases/

